Do you love making things for Christmas? This post will show you how to make horse head Christmas ornaments! Let’s get started.
 You’ll need:
- fine yarn or thread to be used for the horse’s body. I’ve chosen white, an orange for a chestnut colour and grey.
- cardboard (or a book) about 7″ (18 cm) wide to wind the yarn or thread around
- scissors, glue, needle and thread
- ribbon, yarn or thread of different colours, to use for tying knots – I used red yarn and ribbon and thick gold thread
- eyes – available in craft and dollar stores
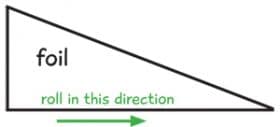
- felt for making ears, foil for unicorn horn
- beads, sequins, bells—use your imagination!
Step 1:

Have the end pieces finish off at the back of the cardboard, on the opposite side of the board from where you will make the first knot.
Cut a piece of different coloured yarn about 50 cm long and tie it in the middle around all the threads. This will be the horse’s muzzle.
Remove the yarn from the cardboard by sliding it off the end. When you wind the thread or yarn around the board have it snug but not too tight or it will be difficult to remove from the book.
1. Estimate how much yarn you will use for the horse’s body. Give your answer in feet and meters.
 Step 2:
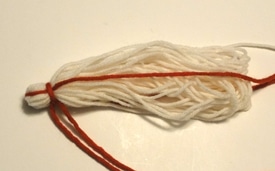
Cut a second piece of yarn (or ribbon) about 70 cm long and tie it under the horse’s muzzle.
Take some time to shape the muzzle. Try wrapping the second piece of yarn several times around the muzzle area to control the width of the horse’s face near the muzzle.
Gently pull the yarn for the horse’s body through the second string so that the yarn is smooth and even. Check that the knots are tight.
 Step 3:
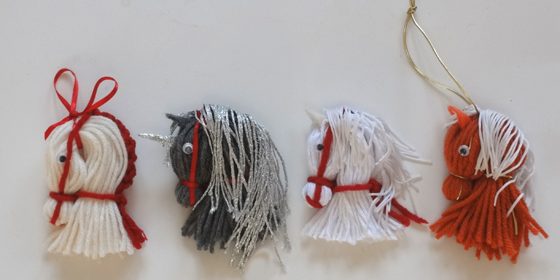
Cut a third piece of yarn or ribbon about 16″ (40 cm) long. This will create the top of the horse’s head. If you tie this in a bow it will look like ears. (See white horse on left in top photo for an example of this.)
Make sure the thread from the first tying passes through the third knot at the top of the head.
One option you have for a mane is to tie the long ends from the first tie together.
As you tie the knots for the mane, pause every couple of knots and stretch out the yarn, as it gets crinkled as the knots are added on. You’ll want it to lie straight and flat along the back of the horses neck.
This is a good time to attach a string to hang the ornament. Tie a string at the third knot. Another option is to use the extra length to create the hanging loop as with the chestnut horse ornament at the right of the top photo.
 Step 4:
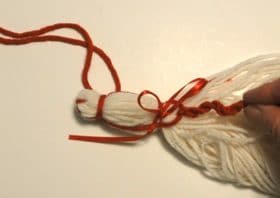
Bend the rest of the yarn or threads to shape the head of the horse.
Tie the thread, remaining from the second tying (the one around the muzzle), to shape the neck of the horse.
Using the scissors, cut the end of the yarn threads and glue on the eyes.
Options:
The bow on the top of the horse’s head is nice but I wanted to try adding ears. To do this I used felt.
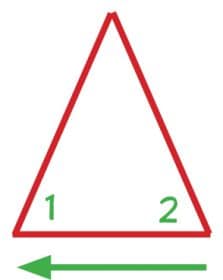
Bring the bottom two corners of the triangles together and keep them there! At first I tried using glue. For whatever reason it did not work on felt! Maybe a hot glue gun would work. If you have one, give it a try and us know it it worked by leaving a comment in the comment box below.
So, I got out my needle and thread and sewed the bottom of the triangle together. One or two stitches was all it took.
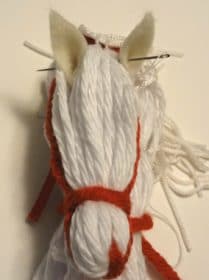
You can see that some of the horse head ornaments in the top photo have felt ears.
2. What fraction of the ornaments in the photo have felt ears?
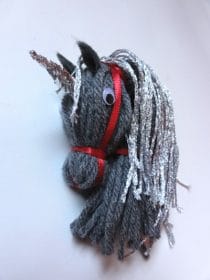
Next comes fringe for the mane. Fringe is available at many fabric stores. I choose white, and when I saw a silvery grey I snapped that up too, half a meter of each.
I cut an 8 cm length of fringe for the mane and tried to glue it in place along the back of the neck. Here again, glue did not work, so I ended up sewing the fringe along the neck with needle and thread.
3. How many horse head ornaments with manes can I make with half a meter of fringe?
4. How many centimeters of fringe would be left over?
Final Step:
Glue the eyes in place. I’m happy to say that finally—the glue did the job!
So you can see, there’s lots of room for your own ideas and creativity. What about adding beads, sequins or bells? Bigger ears would result in mules and donkeys!
I learned from each ornament I made and got a little better each time. What about combining different colours of yarn for a blaze? I wonder if that’s possible?
Answers:
1. Estimate how much yarn you will use for the horse’s body. Give your answer in feet and meters.
US Customary Answer:
Step 1: One full circle around a 7” wide board is 2 (front and back) × 7” = 14”.
Step 2: 30 × 14” = 420”.
Step 3: 420” ÷ 12 (number of inches in one foot) = 35.
There is approximately 35 feet of yarn needed for the horse’s body.
Metric Answer:
Step 1: One full circle around a 18 cm wide board is 2 (front and back) × 18 cm = 36 cm.
Step 2: 30 × 36 cm = 1080 cm.
Step 3: 1080 cm ÷ 100 cm (number of centimetres in one meter) = 10.80 meters.
There is approximately 10.80 meters of yarn needed for the horse’s body.
2. What fraction of the ornaments in the photo have felt ears?
Answer: 3/4 of the ornaments have felt ears.
3. How many horse head ornaments with manes can I make with half a meter of fringe?
Answer:
Step 1: 1/2 m × 100 cm = 50 cm.
Step 2: 50 cm (total length of fringe) ÷ 8 cm (length of one mane) = 6 1/4 manes. I can make 6 manes with this amount of fringe.
4. How many centimeters of fringe would be left over?
Answer: 1/4 × 8 cm = 2 cm. I’d have 2 cm left over.
Common Core:
4.MD.A – Solve problems involving measurement and conversion of measurements from a larger unit to a smaller unit.
4.NF.B.4 – Apply and extend previous understandings of multiplication to multiply a fraction by a whole number
4.NF.C.6 – Model decimals and fractions
5.MD.A – Convert like measurement units within a given measurement system.
5.NBT.A.3 – Model decimals and fractions
5.NF.B.4 – Apply and extend previous understandings of multiplication to multiply a fraction or whole number by a fraction.
Photos:
All photo by Deborah Stacey; CC BY 4.0


 You’ll need:
 Step 2:
 Step 3:
 Step 4:


What a fun project! Thank for posting and making the directions so easy.
I am looking forward to make one of these. A neat idea for using my ribbons for display.
We shared this to the Pony Club Australia Facebook page. Thank you!
What a delightful way to bring the spirit of the season to our equine friends with these horse head Christmas ornaments! While the post didn’t touch on calming supplement for horse, I can’t help but envision a charming addition to your festive creations. Imagine incorporating a small pocket in these adorable ornaments, each containing a tiny, holiday-themed calming supplement for horses. It could be a unique and thoughtful way to share the joy of the season while ensuring our beloved companions experience a touch of tranquility. Wishing you and your readers a holiday season filled with equine charm and perhaps a sprinkle of calming cheer!